Wifi Smart Camera Instructions: Setup and Operation Guide

*We may earn a commission for purchases made using our links. Please see our disclosure to learn more.
Wifi Smart Camera Instructions: Setup and Operation Guide
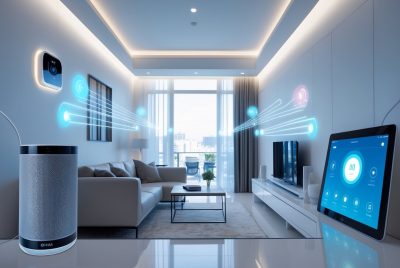
One of the most common questions I receive on a regular basis are there any generic Wifi Smart Camera instructions out there? In today’s world, the integration of smart home products into our daily lives is becoming increasingly common, and one of the most popular additions to any smart home ecosystem is the WiFi smart camera. These devices offer a convenient and flexible way to monitor home security, check in on pets, or simply stay connected with family. One of the main advantages of a WiFi smart camera is the ability to access your video feed remotely from any location, as long as you have an internet connection.

Setting up a WiFi smart camera is generally a straightforward process. I make sure to download the manufacturer’s app and follow the in-app instructions to get the camera working. This often involves connecting the camera to my home WiFi network. Once connected, I can typically control camera settings through the app, which includes configuring the video recording options or adjusting notification settings as needed.
Integration with other smart home products can further enhance the functionality of my WiFi smart camera. I enjoy the seamless experience when my smart devices work in conjunction. The ability to view the camera’s live feed through a smart display or trigger recordings based on the actions of other smart sensors is truly the epitome of modern convenience and adds an extra layer of security and interactivity to the smart home experience.
Choosing Your WiFi Smart Camera

When I select a WiFi smart camera, I consider both the features and the brand to ensure that my home security setup is not only efficient but also adaptable to my needs.
Understanding Camera Features
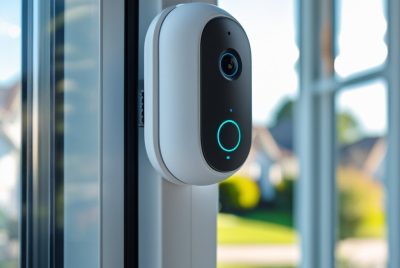
Field of View: I look for a camera that offers a wide angle, typically between 110° to 180°. This helps cover more area without the need for additional devices.
Video Quality: High-resolution video, ideally 1080p or 4K, is my preference to ensure clear images. Quality is crucial for identifying details in the footage.
Night Vision: Good night vision is a must-have. Cameras with infrared or color night vision can provide clear video even in low light.
Resolution: The higher the resolution, the clearer the image. I recommend at least 1080p to ensure that the footage is sharp.
Motion Tracking: A camera with motion tracking can follow the movement, keeping the subject centered and in focus. This is imperative for comprehensive security.
- Smartphone and Tablet Integration: My smart camera must work seamlessly with my smartphone or tablet, allowing remote access and notifications.
Selecting the Right Brand
When it comes to brands, I seek out those with a strong reputation for quality and customer support. A reliable brand often translates to a more dependable security solution. I also check for compatibility with existing smart home systems and look for one that offers a straightforward setup process through an app. Here’s a brief comparison I look at:
| Brands | App Integration | Customer Support | Feature Set |
| Brand A | Excellent | 24/7 | Wide Range |
| Brand B | Good | Business Hours | Limited |
| Brand C | Variable | Email Only | Extensive |
I weigh these factors carefully to find the brand that aligns best with my security needs and technical preferences.
Setting Up Your Account

Before you begin using your new WiFi smart camera, you’ll need to establish a secure account which is essential for managing your device and ensuring its security. I’ll guide you through the process of account creation and securing your account.
Creating an Account
When I’m ready to set up my WiFi smart camera, I first need to download the manufacturer’s app onto my mobile device. Upon opening the app, I’m prompted to create a new account. Here, I enter my email address as my username and create a strong password. It’s crucial that my password is robust, combining letters, numbers, and special characters to prevent unauthorized access.
- Choose “Create Account” or “Sign Up” in the app.
- Provide my email address.
- Create and confirm a secure password.
After submitting my information, I usually receive a verification code via email or text message on my phone. I enter this code into the app to verify my account, which adds a layer of security and ensures that it’s actually me setting up the account, not someone else.
Account Security
Making sure my new account remains secure is not just about creating a solid password; it also involves managing my login credentials carefully and understanding the app’s security features.
- Enable two-factor authentication (2FA), if available, to add an extra layer of security.
- Keep my login credentials private and avoid sharing them with anyone.
- Regularly update my password and use a unique password that isn’t utilized for other accounts.
For extra security, I sometimes have the option to connect a phone number to my account, which can be used to recover my account if I ever forget my login details or if suspicious activity is detected. It is my responsibility to keep my account information up to date to maintain my camera’s security.
Installing Your Camera

When I install a Wi-Fi smart camera, I ensure that it’s positioned optimally for security and convenience and correctly connected to the local Wi-Fi network for seamless operation.
Physical Installation
My first step in physically installing a smart camera involves choosing an ideal location. I ensure the selected spot provides a clear view of the area to monitor and that it’s within reach of a power source to connect the power adapter. Depending on the camera model, mounting may require different approaches; however, I typically use the mounting bracket provided to securely attach the camera to the wall, ceiling, or wherever I choose. I always refer to the manufacturer’s instructions for specifics about mounting the camera.
In addition, I consider whether the camera supports a microSD card for local storage and, if so, insert one into the designated slot. It’s important to do this before mounting the camera, as the slot is often inaccessible once the camera is in place.
Connecting to Wi-Fi Network
For connecting the smart camera to my Wi-Fi network, I start by downloading the camera’s app from the App Store or Google Play. I open the app and select the option to add a new device. I choose my specific model from the app and follow the on-screen instructions, which often involves scanning a QR code located on the camera or manually entering a unique device ID to ensure the app pairs correctly with the camera.
Upon successfully scanning the QR code or entering the device ID, I follow the app’s setup process to connect the camera to my home Wi-Fi network. This usually entails inputting my Wi-Fi network name and password when prompted. Once connected, the camera should confirm the successful linkage audibly or via an indicator light, depending on the model.
Wifi Smart Camera instructions Configuring Your Camera

Before diving into specific configurations, I ensure my WiFi smart camera is connected to a stable internet connection, as this is vital for reliable performance. Proper setup allows me to remotely adjust camera settings and receive notifications directly on my mobile device.
Adjusting Camera Settings
Once the camera connects to the WiFi network, I access the camera settings through the manufacturer’s app that I downloaded from the App Store for iOS devices or Google Play for Android. In this subsection, I focus on how to adjust the camera settings to suit my preferences.
- Resolution & Quality: I select the desired resolution; higher for clarity, lower for saving bandwidth.
- Night Vision: I toggle night vision settings on or off, or set it to automatic.
- Sound & Alerts: For audio reception, I adjust the volume or disable it if preferred.
- Storage Options: I choose where recordings are stored—on the cloud service or locally.
By customizing these settings, I tailor my camera’s functionality to my specific needs.
Motion Detection Setup
Setting up the motion detection feature allows me to receive real-time alerts on my mobile phone. I usually follow these steps to activate and configure motion detection:
- In the app, navigate to the Motion Detection settings.
- Activate motion detection to start receiving alerts.
- Sensitivity: Adjust the slider to set the sensitivity level—higher for more alerts, lower to reduce false alarms.
- Zones: I often specify particular areas of the frame for the camera to monitor. This helps in ignoring movements outside these zones and reducing unnecessary notifications.
Through these adjustments, my smart camera becomes an effective tool for enhancing security and monitoring key areas of my environment.
Wifi Smart Camera instructions Using Your Smart Camera

To harness the full potential of my smart camera, I ensure that I’m adept at using the dedicated app for monitoring and know how to manage device sharing effectively.
Monitoring and Controlling via App
Geeni App and YI IoT App: The core of interacting with my smart camera is through apps like the Geeni app or the YI IoT app, depending on the camera’s brand. I use these apps on my smartphone or tablet to access live footage, review cloud storage archives, and adjust camera settings. After installing the app, I follow these steps:
- Open the app and locate the option to add my smart camera.
- Connect the camera to Wi-Fi by following the on-screen instructions, which typically include scanning a QR code with my camera.
- Position the camera and adjust settings such as motion detection sensitivity and notification preferences via the app.
Voice Control Integration: I can also link my smart camera to voice assistants like Google Assistant and Alexa for hands-free operation. By doing so, I can issue voice commands to control camera functions without needing to physically interact with the device or app.
Understanding Device Sharing
For family members or trusted individuals who also need access to the camera, I make use of the device sharing feature. To share my smart camera:
- I navigate to the settings or device sharing section within the app.
- Choose the option to “Add a Family Member” or “Share Device”.
- Enter the individual’s email associated with their app account.
By sharing the device, others can view the live feed and receive alerts, provided they also have the app installed on their own devices. It’s important for me to ensure that everyone understands how to use the camera and respects privacy considerations when accessing the feed.
Wifi Smart Camera instructions Troubleshooting and Support
In setting up or maintaining a WiFi smart camera, I may encounter issues that can often be resolved through troubleshooting. The key is to recognize common problems and take the right steps to fix them. If difficulties persist, I know there are additional resources to seek further help to ensure smooth operation.
Common Issues and Fixes
Wi-Fi Connection Problems: If my smart camera is unable to connect to Wi-Fi, I should first double-check that I’ve entered the correct password. It’s important to ensure that there are no issues with my internet connection. A stable internet connection is crucial for the camera’s operation. I also need to verify that my router is broadcasting on a 2.4GHz Wi-Fi band, as most smart cameras are not compatible with 5GHz networks.
If the indicator light on the camera is not showing the correct status (often blinking red means ready to connect), this may be a signal that the camera is not in the right state for set-up.
Resetting the Camera: Should problems persist, I might find it necessary to reset the camera. This can be done by pressing and holding the reset button, usually for 3-4 seconds. I should always refer to the camera’s manual for specific instructions on resetting as models may vary.
Seeking Further Help
Wifi Smart Camera instructions when the common fixes do not solve the issue, I know it’s time to contact customer support. Before I do, I prepare details about the issue, any error messages I’m receiving, and the steps I’ve already taken to resolve the problem. This information can significantly streamline the troubleshooting process.
Providing feedback on the issue may help the manufacturer improve their products, so I don’t hesitate to share my experience. If remote troubleshooting is not successful, the customer support team may offer a repair or replacement, depending on my camera’s warranty status.
Frequently Asked Questions
In this section, I provide direct answers to some of the most common inquiries regarding WiFi smart camera setup and troubleshooting.
1. How do I set up my WiFi smart camera for the first time?
To set up your WiFi smart camera, power it on and ensure it’s in pairing mode, usually indicated by a blinking light. Use the manufacturer’s app on your smartphone to add the camera as a new device, generally involving scanning a QR code on the camera or entering a device ID.
2. What steps are involved in connecting my WiFi smart camera to my smartphone?
Install the recommended app for your smart camera, create an account if needed, and select the option to add a new device. Follow the on-screen instructions to connect the camera to your WiFi network, which will typically include selecting your WiFi network name and entering the password.
3. Can I access my WiFi smart camera remotely, and if so, how?
Yes, remote access is possible. Once your camera is set up and connected to the WiFi, you can view live footage or recorded videos from your smartphone through the associated app, as long as your phone has an internet connection.
4. Which app should I use to control my WiFi smart camera?
You should use the app specified by the camera’s manufacturer. Find the app’s name in the camera’s guide or manual; search in your smartphone’s app store.
5. How do I reset my WiFi smart camera to factory settings?
Press and hold the camera’s reset button on its body until the light signals the reset initiation. The exact duration can be found in the camera’s manual.